Saturday, April 26, 2014

Cher (Bell Center)

The energetic & flamboyant CHER delivered a spectacular performance in Montreal, during her Dressed to Kill Tour.  

The Setlist and a few select images can be seen HERE


Friday, April 25, 2014

James Blunt (Bell Center)

The setlist & a few selected images from the James Blunt concert at the Bell Center, can be seen HERE


Thursday, April 17, 2014

Olivier Dion, Lancement de Disque a l'Olympia!

C'est dans un théatre Olympia bondé de plus de 1,000 personnes, q'Olivier Dion a fait le lancement de son premier album, produite par nul autre que Marc Dupré.  Une belle prestation de 7 chansons, donc une avec la superbe Brigitte Boisjoli. 


Quelques images du lancement peuvent etre visionné ICI

Saturday, April 12, 2014

Brit Floyd (Bell Center)


It was a real pleasure, not just to be the only approved photographer during the Brit Floyd concert in Montreal, but to attend such an impressive representation.

Fans gathered and filled the "theater" configuration to savor both, this audible & visual treat.  It's a nostalgic experience, not to be missed, by any Pink Floyd enthusiast!

The setlist, as well as a good selection of images can be seen in a dedicated section of our WEBSITE

Tuesday, April 8, 2014

Black Sabbath receives Platinum Record in Montreal!

During a pre-show press conference, held at the Directors Lounge at Montreal's Bell Center, the original members of Black Sabbath satisfied the media to a 30-min Q&A session, to which some answers were... unexpected, to say the least!


Those of you that have had the pleasure of talking one-on-one with Ozzy, either during his last solo tour, or since then, will know what I'm talking about.  The man is a lot sharper than you'd expect.  He's extremely funny, smart, witty and quick to put you in your place if he feels you deserve it.

At one point, a reviewer asked Ozzy how he was feeling, seeing he was a certain age, and if we could expect another solo tour.  His response was brilliant, and had most of us, laughing to tears. 

Q:  Ozzy, how are you feeling?  After this "reunion" tour, can we expect another solo album?
A:  I'm feeling great!  We no longer consume alcohol or drugs, I go to bed early, and exercise on a regular basis.  As for a solo album, it depends if I'm still alive.  Right now I'm with Black Sabbath, and things are great.
Q:  If you no longer "party", what do you guys do for fun??
A:  We masturbate!! (showing a gesture of the hand)  Not each other, mind you.  This hand is mine, and only mine!

To which the crowd exploded in laughter. (no pun intended)

We were given instructions to keep the questions to a music level, and not ask anything personal, and I'm guessing this was Ozzy's way of putting this reviewer in check.  A few more questions remained after this one, then Universal Music presented the band with a Platinum record. It was a Press Conference that needed not be missed.  A classic!   It was great to see Ozzy as his Whimsical Childish self.


As for the concert... Unfortunately, only 2 daily papers were accredited for photos.  The House Photog (myself), several other daily's, and the .com online sites were all refused access.

A total of 15,559 true fans, gave Black Sabbath an ego boost like they surely didn't expect.  Every lyric of every song, standing, hands in the air like Ozzy requests on numerous occasions.  A 9+ minute drum solo gave the original band members time to catch their breath, before continuing their 17-song performance.  

I'll be the first to admit my disappointment of not being able to capture this moment in images, but just attending the show was extremely memorable.  If you missed the Montreal show, you need to check upcoming tours dates, and make it to the nearest city near you!  Simply an awesome show!!


The Setlist and a few images can be seen, in a dedicated section of our WEBSITE

      iPhone photo


Friday, April 4, 2014

The physical pains associated with photography

This post is obviously directed to professional photographers, that depending on their scope of work, may carry a LOT of gear.  Some assignments have us walk all day long, carrying a surprisingly huge amount of loads, have us crouch down, and take awkward positions, etc...  After time, this will induce strain, and even pain, no matter how young, or good a shape you think you're in.

For example, if you are covering a golf tournament.  You will be walking no less than 10-12km a day, for 4 days straight, bearing loads upwards of 40lbs, sometimes running with all the equipment, crouching down, kneeling, and hastily jumping back up on your feet, to grab that next shot.  If you're editing on site, you're adding the weight of a laptop, charger, mouse/mousepad, ethernet cables, packsack, etc.... (it all adds up).

Same goes for events such Auto racing, music festivals, and several other mandates that demand a wide variety of equipment, commuting long distances, and rapid submitting of images, thus having you rush to and from the press quarters on a frequent basis.

The most common pains are associated with shoulders, neck, back & elbows. 

Here are a few tips that will help you stay in good form, reduce the risk of injury, and keep you doing what you enjoy doing the most, photography.

1. Exercise on a regular basis 
Don't take physical activity lightly.  Staying in shape will help prevent discomfort and injury. Consult a professional to see what program may suit you best, and start being more active... Today!

2. Take the time to stretch 
Before each day of a demanding mandate, take 5-10mins to stretch.  It will make the utmost of differences in your day, and how you're going to feel the day after.  Here's a guide to 10 basic STRETCHES

3. Use a harness to help distribute to weight
Distributing the weight to larger core muscles, is the key.  By using a harness, the weight is spread across your entire back, lats, and traps.  Try to prevent using a belt-type system, as most are floppy & cumbersome when you walk briskly or run, and all the weight is directed to your lower back.

Packsacks can be great, but the downside is that you don't have your gear as readily available to you. (quick-access).

Both NEWSWEAR & THINKTANK make a variety of options that will help you carry loads of gear, and on the same token, keep them away from the elements.  Note to Nature Photogs, some models have loud velcro enclosures, others have remedied the situation with a secondary flap.
 
4. Use a a hand strap to ease the grip
This may seem awkward, but easing the grip releases strain on your hand, forearm and elbow, and greatly reduces the risks of epicondylitis (tennis elbow).  

Most major brands will have a hand grip unit available for your camera body.  Personally, I use the Canon E1.  You'll be surprised and how effective they are.  Once you try them, you'll never go without one.


5. Make use of any transport means made available by the event organizers
If the event organizers have shuttle buses, golf carts available for media members, don't be shy to make use of them.  Most often you'll save time, and precious energy.  At the end of the day, you'll be glad you did!

6.  Wear the most comfortable shoes you can find
When it comes to footwear, don't cheap out!  There's nothing worst than being in the middle of the day, and having sore feet, with another 5-6 hours, and several Km's to go before days end.  Investing in comfortable shoes, and even gel insoles, isn't something you'll ever regret.

7. Take the time to rest, sit down, and relax in between mandates
You shouldn't be expected to run like crazy for 12-hour days, non-stop.  Take the time to sit and relax (in worst cases, while editing), enjoy a meal, drink plenty of fluids.

8. A warm/hot bath
After a demanding days work, taking a warm/hot bath will not only help you relax, but will also help ease the ache in your muscles while reducing muscle tension.

Wednesday, April 2, 2014

Show Harley (Bell Center)

Sorry for the slight delay in making this post available, but the organizers of the show had prevented us from posting any of our images, until recently. 

For some time now,  Harley-Davidson dealers in the Province of Quebec, have gathered and participated in showing the years new models, and shown what modifications they've made to these "beasts". Together, with great concerts and fine ladies, this scenario makes for an evening to be savored by any motorcycle enthusiast.

Without further delay... a few select images can be seen in a dedicated section of our WEBSITE


Tuesday, April 1, 2014

How to properly (& safely) clean your camera sensor!

Like everywhere else, dust also settles on your camera sensor.  No matter how careful, or quickly you change your lenses, eventually, the sensor will need to be freed from the volatile "debris", as spots will become apparent on your images.

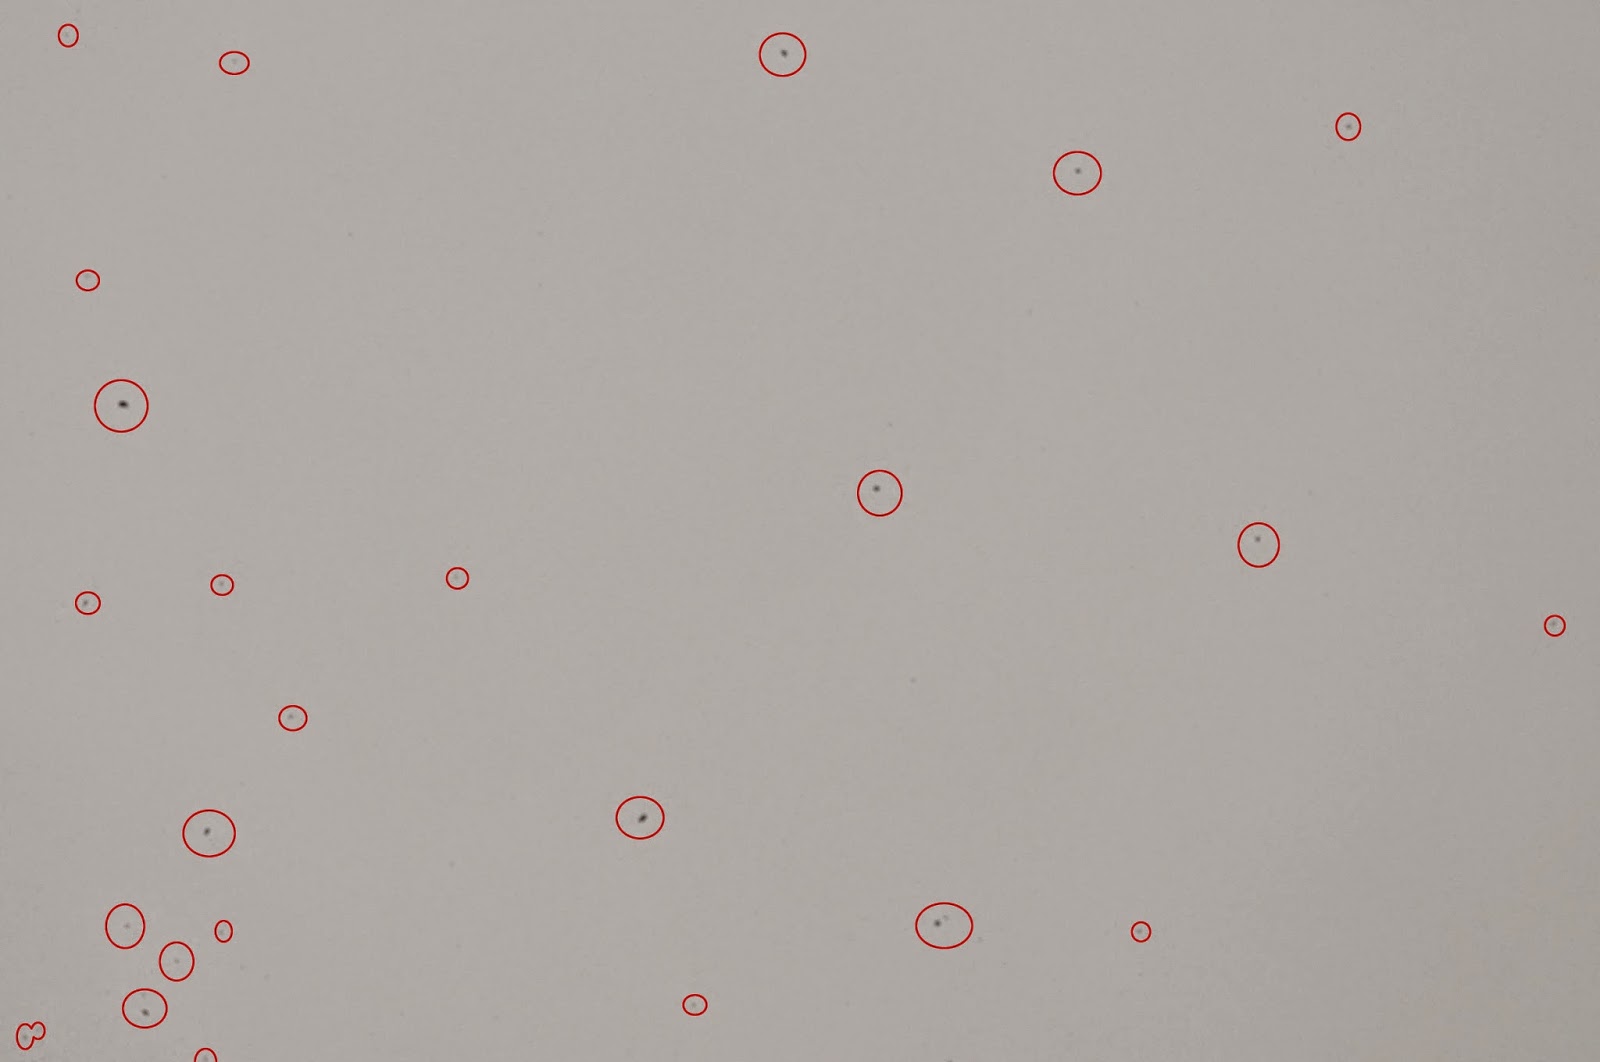
Do the test... Use a tripod, and while using the camera`s exposure meter, target a white wall & set your ISO high enough, and exposure time long enough, to compensate for an F22 depth of field.  In my case, it was... 1/6 sec, ISO 3200 & F22.  

Because the particles aren't sitting directly on the sensor, but most specifically on top of the filters covering the sensor, the higher the depth of field, the more visible and detailed they will be on your image. Look at your image at 100% scale, on your monitor.  If present, Dust should be easily visible.  Another good trick to see the particles on screen more easily, is to open the image in Photoshop, and use the "Emboss" Filter.


We'll show you how to efficiently and safely remove dust, using a brush and compressed air.  You'll need a specialty brush, and a can of compressed air (sold at most large-surface retailers). 

At first, you may find this quite nerve-racking, but after a few times, you'll be able to it, while having your morning coffee.  There's really nothing to it, and no need to go and have it done at the local camera shop.  Plus, carrying a specialty brush, and finding a can of compressed air, is a lot easier when traveling on a shoot, than locating a trustworthy and authorized retailer!

I'll use details from a Canon camera body, as that's what I have on hand, but the same applies for other makes and models as well.

Let's get started!
1.   Make sure your camera battery is fully charged  (you don't want the mirror
      to flip back down while you're in there with a brush)
2.   In the menu, under the "Clean Sensor" option, select "Manually Clean"
      (this will flip the mirror up, and reveal the sensor for easy access)


3.   Use a dedicated "Visible Dust" type brush that easily magnetizes
4.   Use a can of compressed air to "Activate/Magnetize" the brush
5.   Gently swipe the brush from Right > Left


6.   Repeat from Left > Right, using the other side of the brush
7.   Use compressed air to remove debris from the brush, and re-activate
8.   Repeat steps 5 & 6
9.   Install lens
10. Turn camera Off, to complete the process.


Note*  Do NOT use compressed air directly in the camera body!!

Here are a few Tips, to help you prevent having to clean your sensor too often;
1.  Try to interchange your lenses in a "clean" environment
2.  Avoid changing lenses in windy areas whenever possible
3.  Keep the camera facing down (work with gravity, not against it)
4.  Never change your lenses in the rain (water spots are harder to clean)
4.  Change the lens quickly

If you experience having to conduct a more rigorous cleaning to remove stubborn spots, other "wet" products are also available.  This practice is slightly more technical, and some of you might prefer going to see a specialist.