Saturday, November 30, 2013

Marie-Mai (Bell Center)

To see additional pics from that event, click HERE
 In the cast of her "Miroir" tour, Marie-Mai gave her fans, 2 electrifying performances at the Bell Center, Nov 28th-29th 2013.  

Friday, November 29, 2013

Using Wireless Triggers to control Remote Cameras

Remote Cameras
In certain cases, it is difficult, yet impossible to be located, at the ideal vantage point from where you'd like to be holding a camera. Other times, it's just more convenient to have several cameras positioned in different locations, while you shoot with a hand-held, from another unrestricted area. Perfect examples of this are; a goal cam during a hockey game, a cam positioned behind the backboard at a basketball game, ceiling during a boxing gala, etc...

It also prevents you from having to run around so much, as most remotes cover a huge range of field.  Some venues have funky designs, and it's difficult to get from one section to another, without losing precious time in the crowd and/or elevators.

During a recent concert, I had placed a camera behind the stage, aiming towards the crowd.  This avoided me from having to go on stage, and risk disturbing the artist, stumble over cables, or worst, get in the way of pyros! In this post, we'll provide you with a few examples, along with detailed settings, and touch base on a few basic pointers of how to set your camera, what gear I personally use, and what my experience has been with wireless remotes.  (Sorry for the iPhone photo)
 
I use the Pocket Wizard Plus III series remotes, for several reasons. For one, Their rugged construction comes in handy when fumbling lots of gear.  I've yet to break one of these.  They also have an impressive range of 500 Meters, 32 Channels, ease of use, and let's not kid ourselves... the fact that they are reasonably priced helps a lot in justifying having 4-5 of these!  Don't forget, you need one unit to transmit the signal, and one unit for each other camera body you which to trigger.  When using them to control studio lighting, you don't need as many, as you can set your heads to detect flashes to trigger the others instantaneously.

Tips
1.  Make sure you disable the camera auto-sleep mode
2.  Disable photo review, so it won't drain your battery as quickly
3.  Safety is key, make sure all remote cams are "secured" with approved cables.
4. I usually set my zoom distance, calculate the Depth of Field, switch the lens to MF
   (Manual Focus), and tape everything down, so it doesn't move with vibrations.

Goal Cam
Placing an expensive camera body in a "plastic" enclosure, to potentially face a 100mph slap-shot, is something quite discomforting, in my mind.  Yet, it enables you to obtain some pretty spectacular pics!  The enclosure usually needs to be approved by the federation (NHL, LHJMQ). Instead of placing the "transmitter" unit on the hand-held camera, and take simultaneous shots, I usually trigger with a foot switch, or push-button switch in my hand.  This prevents taking too many unwanted shots, when your hand-held camera is capturing action away from the goalie.  It's also a good idea to hook up your laptop to the goal cam, to ensure that you've angled it properly, and that the captured images are well framed.

Thursday, November 28, 2013

2013 Best & Worst Careers

How deep has the Industry sunk?
CareerCast.com has recently drawn up a list on the 200 Best-to-Worst Careers.  Why do you think Photographers & Photojournalists are 172nd & 188th respectively?  Has the digital era killed the industry altogether?  Many have tried to demystify this topic, few have gotten the answer.  We have however, found several interesting articles.

Wednesday, November 27, 2013

Useful Camera Settings (Outdoor Sports)

Camera Settings
Depending on the sport you are covering and the weather conditions, outdoor sports will vary considerably.  For instance, if you're shooting auto racing on a bright sunny day, or your grandmothers lawn dart team on a cloudy day ;), the settings will be on opposing ends of the scale.  Most times I'll use an F2.8 to F4 depth of field, in order the have a nice "soft" background (making the subject pop out of the picture), and leaving myself enough margin to crank up the speed, to freeze the action, without having to boost the ISO too high, and avoid having too much digital "noise" in an image.  But keep in mind, if you're shooting a football/soccer match, and the conditions switch from daylight, to artificially lighted conditions, don't be scared to boost the ISO, instead of reducing the speed.  You want the ball to be sharp!  For boat racing, my settings are something like this...

Full Manual Mode, F5.6, 1/1250sec speed & 640 ISO

You may also like to try and accentuate the "Speed" effect by slowing down the camera speed, to create a panning shot.  Make sure you are as perpendicular as possible to the subject.  In this case, I was lucky enough to have permission to be in the water.  Auto racing yields better panning pics than boat racing, as there is no "up-down" motion of the subject, and they have a more fluid motion from side to side.

Full Manual Mode, F5.6, 1/40sec speed & 50 ISO

More examples of sports photography can be seen on our website, by following this link > HERE

Tuesday, November 26, 2013

Photographers Unwritten Rules of Conduct

Below is a list of "Unwritten Rules" that should be observed by any photographer that respects himself, and wishes to be respected by his clients and fellow photogs.  I'll even throw in a few, about people that deal with photographers, for good measure ;)

Some are serious issues, others less, and mostly about etiquette, but all of you will agree that common sense should prevail!  YES, I have witnessed all of these first hand, and NO, I won't be mentioning names. (Don't even ask)

1. Don't mix up Passion for Profession!
Having a DSLR camera and taking pictures doesn't make you a Professional photographer.  Making Photography your Profession and main source of income, gives you the right to title yourself as a "Professional".  If most of your "work" is taking images of your pets, family members, or accepting contracts free of charge, it makes you a hobbyist.  There's nothing wrong with being a hobbyist, unless you are offering your products & services for free, to people who should be paying.  Although you may be quite good, and very passionate about photography, you are still going against all rules of business.  Have you ever seen a plumber offering his services for free, because he was passionate about leak-free pipes?  Neither have I.  Respect the industry, and those who have been doing it as their main source of revenue, and charge a fair market price for your work.  PS... $59 for a 2-hour shoot with 6 touched-up images, is NOT considered to be a fair market price!

2. Blend in, and be as less visible as possible!
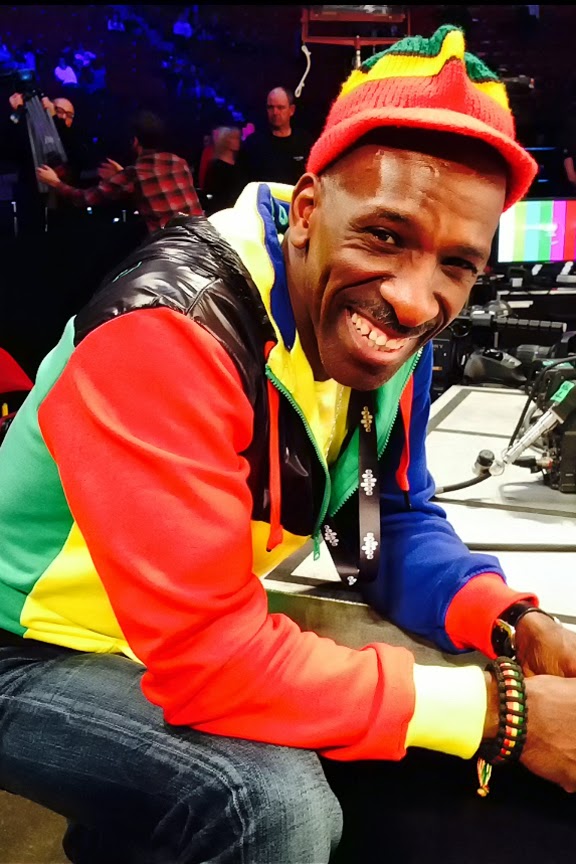
If shooting a concert from a pit, boxing gala ringside, or a team sport from the sidelines, you should acknowledge this privilege by respecting the artist/players, and dress to be as conspicuous as possible.  The crowd didn't come to the venue to see you.  Most importantly, the "Main Attraction" surely doesn't need the distraction of your brightly-colored or fluorescent shirt. Wear dark colors, and be part of the shadows.  Your clients, co-workers (and the talent) will appreciate you for it.  Wearing bright fluorescent color, when shooting ringing at a boxing gala, (with live coverage on HBO), is NOT a good way of blending in.  I'm thinking that possibly, our photographer friend, Herbie, hadn't gotten the memo! ;)

3. As an assistant or intern, don't distribute your business cards to the client!
This should go without saying, but personally, I don't have enough fingers on both hands, to count the times that my assistants or interns have given (or tried to give) their business cards to my clients.  Really, is that how you thank the guy that hired you?  What do you expect, the client to drop his supplier to deal with his assistant?  Be smart, play it low key, and you'll continue to get work, instead of getting a bad rap and putting yourself on the "Don't Touch" list.

4. Photo Credit!
If a photographer has provided you with images that contain a photo credit, logo or watermark, it was put there for a reason. Don't crop it out!  If you use a photographers image on a social media site, the least you could do to thank him, is make sure his photo credit and link is clearly visible.  After all, these are HIS photos.  I'm willing to bet, that the more exposure you give the photog in question, more perks or additional photos will come your way.  What goes around, comes around!

5. Closer is NOT always better!
When shooting a Press Conference, show a little respect for others, and bring a telephoto/zoom lens.  Being 4-feet away from the speaker with your arm in the air, using a wide angle lens might get you decent shots, but, it will also prevent anyone else in the room from getting any at all, (without parts of you in the frame).  Bring the necessary gear for the task at hand.  By the way, this is also true for you "artistic" photogs that stick a fisheye lens in artists faces during a concert.  If you must do so, try to make it quick.

6.  Accreditation should NOT be taken lightly!
Whatever the gig, if you've been given directions or a time-frame of what, and what NOT to shoot, follow these simple directions.  Example; If you're shooting a concert and were given the first 3 songs..., you shouldn't start shooting before the first note, and stop shooting on the last note of that 3rd song.  Trust me, if you don't have enough of 3 songs to get a few good pics, you have no business being there!  Worst... I've seen Photogs buy themselves tickets in the first 3 rows, and shoot the entire gig with their smuggled-in DSLRs, then create fake accounts, and posting them on their site, as if "Fans" had provided the images!  Yes, that's low, and it makes us ALL look bad.

7. Don't submit free images to another photogs client!
If you're covering an event for a media, don't go giving your shots for free to the end user.  First, you're prostituting the market, and killing the industry (in addition to not making a very good name for yourself).  Secondly, chances are, the end user has enough budget to pay for those images.  Let's all take a few minutes to think about why photogs were making more income 20 years ago than today.  Sad, but true.

8. If you're getting paid, pay those working for you!
This is especially true for MUA & Stylists.  As a photographer, you don't expect to work for free, so please, make sure that those who work for you, are also well compensated for the great work they do.  Without them, you wouldn't obtain the same results.

MORE TO COME...

Monday, November 25, 2013

Workflow...

We all agree that a photographers "Workflow" is as personal as it gets, but, that it's also project-dependent.  Let me explain;  In my case, I won't use the same workflow for a portrait shoot, as I would for a concert or a cultural project, and especially, a sporting event.  Although some aspects of it are similar, each have their own "twist". As the delivery time-frame and project type differs, so does the level of retouching.  But because several of you have asked politely, if I'd be willing to share some of my workflow "secrets", I've decided to oblige.  As such, I'll provide you with a brief description of a "generic" workflow that I use on a regular basis, that suits my needs, in this case... for a concert shoot.  Hope this helps!

1.     Capture Images
2.     Create folder on computer for the Event
3.     Open Photo Mechanic Software
4.     Download images to the Event folder
5.     Select images, starting with the ones I've tagged on the camera
6.     Rename selected images;  Event_byPatBeaudry_###   (001, 002, 003)
7.     Create a "Selected" folder and make a duplicate copy of the chosen pics
8.     Create a "Submitted" folder, that will later contain the processed images for the client
9.     Create a "Framed" folder, that I'll add my personal touch for Facebook, website, Blog, etc...
10.    Open Photoshop or Lightroom Software
11.    Open the 30-35 images in Camera RAW
12.    Treat the Contrast, Saturation, Exposure, Recovery, etc... to my taste
13.    Apply Noise Reduction, if needed
14.    Add 12% Structure
15.    Add 6% Sharpness
16.    Save in PSD Format in 8x12x300dpi
17.    Batch Convert to JPG File Format
18.    Batch IPTC information
19.    Upload image files to client via FTP
20.    Invoice client
21.    Add personal Frame/Signature
22.    Batch Resize to various sizes for Facebook, Blog, Fan Page & Website
23.    Post to various Social Medias and Networks

In the event of a modeling, Portrait or Maternity shoot, we send Contact Sheets of all images, for the client to make the selection.

Sunday, November 24, 2013

Portrait Shoot with Mylene Lacroix

Our portrait shoot with the lovely Mylene Lacroix, yielded some pretty awesome pics (As you can see by these preliminary samples). 

A total of eight (8) different looks were completed in a record time.  This girl can model!

A few more select images from that portrait shoot, can be seen  HERE


Saturday, November 23, 2013

Vanier Cup Football Game

It was at the PEPS Stadium, and in front of more than 18,000 fans, that The University Laval, was able to overcome the University of Calgary, in a start to finish nail-biting game.  It was a frigid day, but this game sure kept the adrenaline going in all of us!
To see additional pics from that event, click > ADDITIONAL GAME PICS


Beware of a sudden file type/size change!

Who would have thought!?!
If like me, you usually carry 2-3 camera bodies on any given assignment, then there's a chance that the one you have around your neck, may experience what mine did!

After shooting the Vanier Cup Football game, I transferred the CF cards from each of the three (3) camera bodies, only to noticed that on one (1) of the cards, the files changed from Full RAW to Small JPEG, midway during the game.  How was that possible!?!

Was it the cold weather, had someone in the press room tampered with my gear?  It was a complete mystery, until I reconstructed the pieces of the puzzle.  It was the camera body around my neck, with the smaller lens mounted on it (in this case a 16-35mm). 

If the event you are covering has you running around, and you are carrying a camera around your neck, (along with others), and that you have a chest vest, the camera, while bouncing around, can accidentally hit the "File Size" button, and toggle from one mode to another.   Mystery solved!

I haven't thought of a quick fix to prevent this as of yet, but will inquire with Canon, to see if there's a way to dis-engage that button, through firmware. I'll keep you posted, meanwhile, I'd suggest you keep an eye out, and verify that the file size you've selected to shoot with, hasn't changed... "On it's Own".

Update (Nov. 25th 2013) - After verification with Canon's Technical Support team, as of yet, there's no way to disable this button. However, they have passed the information along for future consideration.

Wednesday, November 20, 2013

ICON A5 Update

Awesome News!
Here's the updated status on the ICON A5 Aircraft delivery. As some of you may know, we've placed an order for our A5 in July 0f 2011, knowing that delivery would take a while, since we are 562nd on the recipients list, to take possession.

The FAA has awarded ICON with an exemption on the "maximum take-off weight" allowance for an LSA (Light Sport Aircraft), in order to allow for the SRA (Spin-Resistant Airframe). This airframe modification will provide added safety in the event of a stall, preventing tailspin.

This will give ICON the long-awaited "green light" to go in full production. ICON has already upgraded several features (aside from the SRA), like the Garmin Aero 796 GPS, Fuel Injected engine, removable windows, etc...

Based on recent updates, we expect to take delivery sometimes in Q4 2016.  You can read up and obtain additional details on the SRA article HERE

We look forward to being able to fulfill your aerial photography projects, using this state-of-the-art aircraft. The ICON A5 Official Website > http://www.iconaircraft.com/

Camera Settings (Concerts)

Camera settings
I'm often asked about "typical" camera settings, and what should be used in various situations. As such, I've gathered a short list of what I use most, depending on the provided or adjusted light, motion, and overall conditions.

Concerts
Concert photography, in some cases, can be the most challenging type to capture in image.  Not only technically, but also the surroundings.  Let me explain...  You can have 20,000 screaming fans behind you (You think you can zone it out? try shooting a One Direction concert!), security acts like you have no business there, you get kicked in the head by crowd surfers, the fans envy you, band management rarely provide you with anything more than 2-3 songs to shoot, the band rarely acknowledges you, and seldom are the cases when you have good lighting! Still, it's what makes us "tick", and wouldn't live without it!

As for camera settings... here's a little insight to our magic!

Let's face it, each concert is different, and depending on the music type and artist, concert lighting can "even" or ever-changing, with strobes from the back of the scene, pointing directly at you (example; the recent NIN concert).  So because of this, I usually start in Manual mode, with a setting similar to this... Full Manual Mode, F3.2, 1/320sec & 1600 ISO.  If the lighting is changing at a fast pace, I'll boost the ISO to 2000 ISO and switch to speed priority (TV), and let the camera select the depth of field, while defining a range for the speed.

Full Manual Mode, 200-400mm Lens F4, 1/400sec & 2000 ISO